Welcome back to the next post in the series about deploying a multinode OpenStack testlab environment. This time we will focus on the outside-in to our cluster. We will create a gateway server for our SUSECloud OpenStack deployment and access the floating IP space as well as a private network.
Prerequisites
Have a cluster installed like in: SUSECloud Part 1 - Install The Multi Node OpenStack/Ceph Environment and SUSECloud Part 2 Point and Click or SUSECloud Part 2 Commanline
Remember, we have cluster deployed like so:
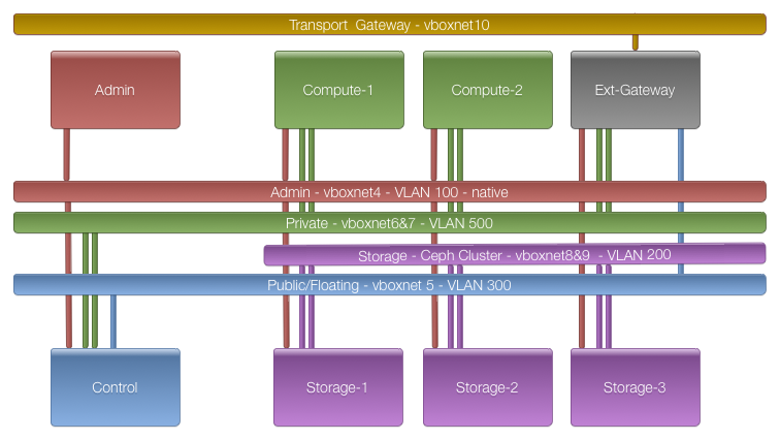
The missing part ist the gateway. The initial steps are the same as with the admin node.
Install SLES SP3 On The Gateway Node
Boot up the gateway node
VBoxManage startvm testcluster-gateway --type headless
VBoxManage controlvm testcluster-gateway vrde on
Now we can watch the progress with the windows remote desktop client. Use the Microsoft Remote Desktop Connection Client for Mac 2.1.1 and connect to
<host-ip>:5011. The preload iso asks if it should install to the disk. Here we have to use a little trick. Use the arrow keys (down,up,down, NOT right,left,right!) to change back and forth between Yes and No and hit return on Yes. I had an issue just hitting return which aborted the installation. After the installation you are asked to accept the EULA. Say yes if you want to install SLES SP3.
To understand which interface is connected to our admin lan please visit SUSECloud Part 1 - Install The Multi Node OpenStack/Ceph Environment.
TLDR; Login to the node on the RDP console. Username: root, password: linux.
admin:~ # ip a|grep -B1 07:01
7: eth5: <BROADCAST,MULTICAST,UP,LOWER_UP> mtu 1500 qdisc pfifo_fast state UP qlen 1000
    link/ether c0:ff:ee:00:07:01 brd ff:ff:ff:ff:ff:ff
So eth5 is connected to vboxnet4. And it has the wrong IP. We have to choose one from the admin lan range which will not be used by SUSECloud in this deployment. 192.168.124.9 will do. Lets fix this:
mv /etc/sysconfig/network/ifcfg-eth0 /etc/sysconfig/network/ifcfg-eth5
sed -i 's/192.168.124.9/192.168.124.10/' /etc/sysconfig/network/ifcfg-eth5
echo "192.168.124.9  gateway.suse-testbed.de gateway" >> /etc/hosts
echo "192.168.124.10  admin.suse-testbed.de admin" >> /etc/hosts
echo gateway > /etc/HOSTNAME
hostname -F /etc/HOSTNAME
/etc/init.d/network restart
Now we can ssh from the host to the admin via vboxnet4. The next thing we want to do is connect the public/floating net. Have a look at the following image:
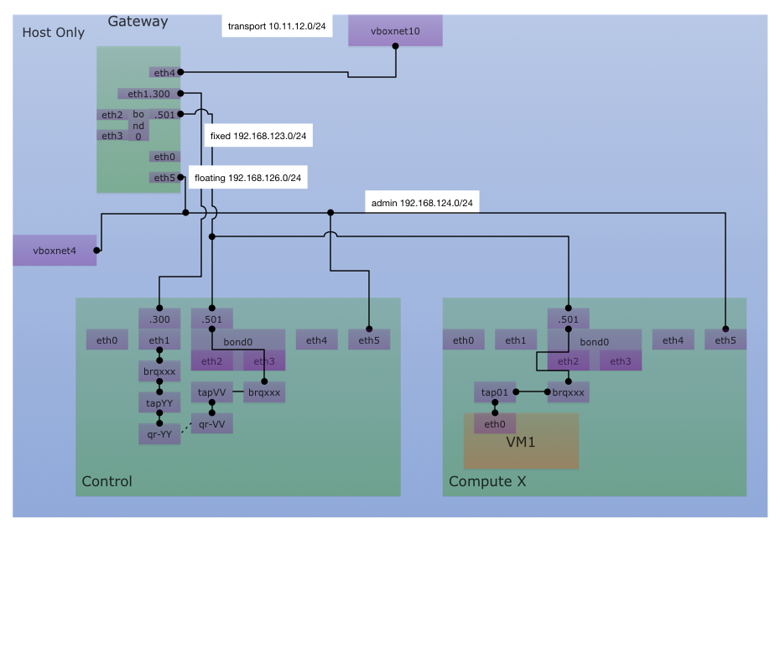
We are talking about the 192.168.126.0/24 net.
- we know that it has the mac ending with 02
- we have to assign an ip at vlan 300
- since this node is the gateway it has to have the IP
192.168.126.1
gateway:~ # ip a|grep -B1 07:02
3: eth1: <BROADCAST,MULTICAST> mtu 1500 qdisc noop state DOWN qlen 1000
    link/ether c0:ff:ee:00:07:02 brd ff:ff:ff:ff:ff:ff

gateway:~ # cat > /etc/sysconfig/network/ifcfg-eth1 <<CONFIG
NAME='eth1'
STARTMODE=auto
BOOTPROTO=static
CONFIG

gateway:~ # cat > /etc/sysconfig/network/ifcfg-eth1.300 <<CONFIG
NAME='eth1.300'
STARTMODE=auto
BOOTPROTO=static
VLAN_ID=300
ETHERDEVICE='eth1'
IPADDR=192.168.126.1/24
CONFIG
gateway:~ # /etc/init.d/network restart
Now we can connect from the gateway to the control node (which is our neutron server)
gateway:~ # ping 192.168.126.2 -c1
PING 192.168.126.2 (192.168.126.2) 56(84) bytes of data.
64 bytes from 192.168.126.2: icmp_seq=1 ttl=64 time=0.538 ms

--- 192.168.126.2 ping statistics ---
1 packets transmitted, 1 received, 0% packet loss, time 0ms
rtt min/avg/max/mdev = 0.538/0.538/0.538/0.000 ms
Since this node is our gateway we have to configure the connection from the outside in. The network we need ist the one connected to vboxnet10
On the host:
VBoxManage showvminfo testcluster-gateway|grep vboxnet10|awk '{print $4}'
C0FFEE000705,
On the gateway:
gateway:~ # ip a|grep -B1 07:05
6: eth4: <BROADCAST,MULTICAST> mtu 1500 qdisc noop state DOWN qlen 1000
    link/ether c0:ff:ee:00:07:05 brd ff:ff:ff:ff:ff:ff
gateway:~ # cat > /etc/sysconfig/network/ifcfg-eth4 <<CONFIG
NAME='eth4'
STARTMODE=auto
BOOTPROTO=static
IPADDR=10.11.12.2/24
CONFIG
gateway:~ # sed -i 's/IP_FORWARD="no"/IP_FORWARD="yes"/' /etc/sysconfig/sysctl
gateway:~ # echo 1 > /proc/sys/net/ipv4/ip_forward
gateway:~ # /etc/init.d/network restart
Now we have to add a route on the host to connect to the public/floating net
route add -net 192.168.126.0/24 gw 10.11.12.2 dev vboxnet10

 ping -c 1 192.168.126.2
PING 192.168.126.2 (192.168.126.2) 56(84) bytes of data.
64 bytes from 192.168.126.2: icmp_req=1 ttl=63 time=1.31 ms

--- 192.168.126.2 ping statistics ---
1 packets transmitted, 1 received, 0% packet loss, time 0ms
rtt min/avg/max/mdev = 1.316/1.316/1.316/0.000 ms
Additionally we can set up a config allowing us to access the pre-configured private network 192.168.123.0/24. This network is a vlan on the bond0.
gateway:~ # ip a|grep -B1 07:03
4: eth2: <BROADCAST,MULTICAST> mtu 1500 qdisc noop state DOWN qlen 1000
    link/ether c0:ff:ee:00:07:03 brd ff:ff:ff:ff:ff:ff
gateway:~ # ip a|grep -B1 07:04
5: eth3: <BROADCAST,MULTICAST> mtu 1500 qdisc noop state DOWN qlen 1000
    link/ether c0:ff:ee:00:07:04 brd ff:ff:ff:ff:ff:ff
So we have to create configs for eth2,eth3 and bond0
cat > /etc/sysconfig/network/ifcfg-eth2 <<CONFIG
NAME='eth2'
STARTMODE=auto
BOOTPROTO=none
CONFIG

cat > /etc/sysconfig/network/ifcfg-eth3 <<CONFIG
NAME='eth3'
STARTMODE=auto
BOOTPROTO=none
CONFIG

cat > /etc/sysconfig/network/ifcfg-bond0 <<CONFIG
NAME='bond0'
STARTMODE=auto
BOOTPROTO=static
BONDING_MASTER=yes
BONDING_MODULE_OPTS='mode=5 miimon=100'
BONDING_SLAVE_0='eth2'
BONDING_SLAVE_1='eth3'
CONFIG

cat > /etc/sysconfig/network/ifcfg-bond0.500 <<CONFIG
NAME='bond0.500'
STARTMODE=auto
BOOTPROTO=static
VLAN_ID=500
ETHERDEVICE='bond0'
IPADDR=192.168.123.1/24
CONFIG

/etc/init.d/network restart
Now we are able to ping the fixed network bridge
gateway:~ # ping 192.168.123.49 -c1
PING 192.168.123.49 (192.168.123.49) 56(84) bytes of data.
64 bytes from 192.168.123.49: icmp_seq=1 ttl=64 time=0.946 ms

--- 192.168.123.49 ping statistics ---
1 packets transmitted, 1 received, 0% packet loss, time 0ms
rtt min/avg/max/mdev = 0.946/0.946/0.946/0.000 ms
Finally lets add the route to the host too
route add -net 192.168.123.0/24 gw 10.11.12.2 dev vboxnet10
Interested in Cloud or Chef Trainings? Have a look at our Commandemy Trainings page. Need help migrating to the cloud? Check out Infralovers.
comments powered by Disqus